In custom printing technology, Direct to Film (DTF) printers is now one of the most popular techs due to their ability to produce high-quality prints on a variety of fabric products. This article will introduce you to DTF printing technology, its advantages, the consumables needed, and the working process involved.
Evolution of DTF Printing Techniques
Heat transfer printing techniques have come a long way, with the following methods having gained prominence over the years:
- Screen Printing Heat Transfer: Known for its high printing efficiency and low cost, this traditional method still dominates the market. However, it requires screen preparation, has a limited color palette, and can cause environmental pollution due to the use of printing inks.
- Colored Ink Heat Transfer: As the name suggests, this method lacks white ink and is considered a preliminary stage of white ink heat transfer. It can only be applied to white fabrics.
- White Ink Heat Transfer: Currently the most popular printing method, it boasts a simple process, wide adaptability, and vibrant colors. The downsides are its slow production speed and high cost.
Why Choose DTF Printing?
DTF printing offers several advantages:
- Wide adaptability: Almost all fabric types can be used for heat transfer printing.
- Broad temperature range: Applicable temperatures range from 90-170 degrees Celsius, making it suitable for various products.
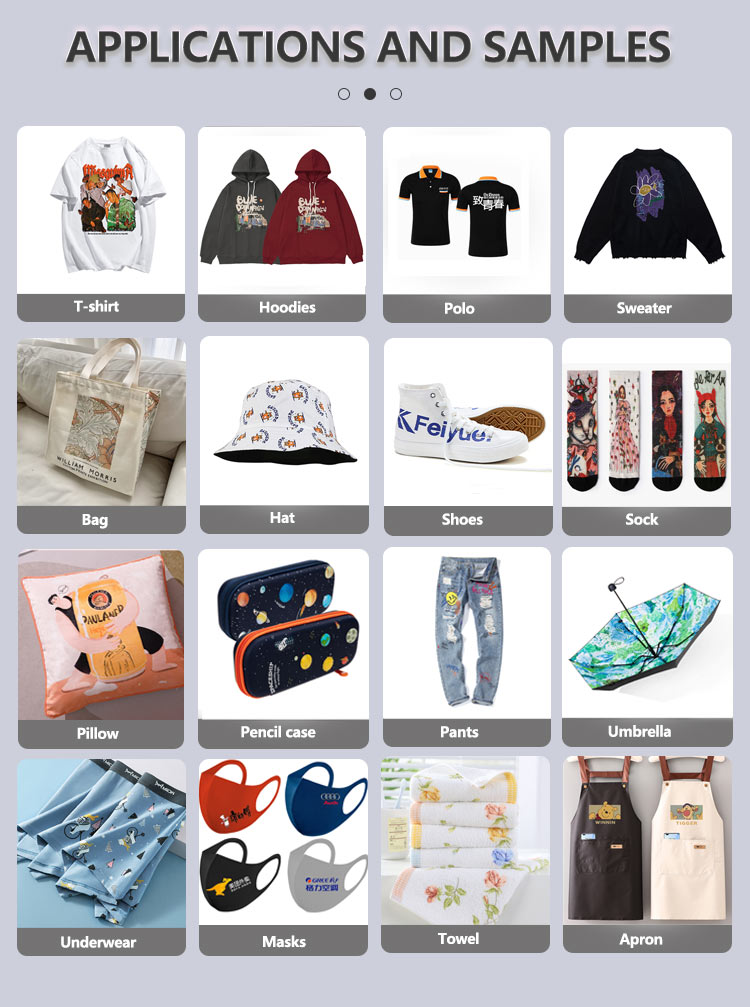
- Suitable for multiple products: This method can be used for garment printing (T-shirts, jeans, sweatshirts), leather, labels, and logos.
Equipment Overview
1. Large-format DTF Printers
These printers are ideal for bulk production and come in widths of 60cm and 120cm. They are available in:
a) Dual-head machines (4720, i3200, XP600) b) Quad-head machines (4720, i3200) c) Octa-head machines (i3200)
The 4720 and i3200 are high-performance printheads, while the XP600 is a smaller printhead.
2. A3 and A4 Small Printers
These printers include:
a) Epson L1800/R1390 modified machines: The L1800 is an upgraded version of the R1390. The 1390 uses a disassembled printhead, while the 1800 can replace printheads, making it slightly more expensive. b) XP600 printhead machines
3. Mainboard and RIP Software
a) Mainboards from Honson, Aifa, and other brands b) RIP software such as Maintop, PP, Wasatch, PF, CP, Surface Pro
4. ICC Color Management System
These curves help set ink reference amounts and control the ink volume percentage for each color segment to ensure vivid, accurate colors.
5. Waveform
This setting controls the inkjet frequency and voltage to maintain the ink drop placement.
6. Printhead Ink Replacement
Both white and colored inks require thorough cleaning of the ink tank and ink sac before replacement. For white ink, a circulation system can be used to clean the ink damper.
DTF Film Structure
The Direct to Film (DTF) printing process relies on a specialized film to transfer printed designs onto various fabric products such as t-shirts, jeans, socks, shoes. The film plays a vital role in ensuring the accuracy and quality of the final print. To understand its importance, let's examine the structure of DTF film and its various layers.
Layers of DTF Film
The DTF film consists of multiple layers, each serving a specific purpose in the printing and transfer process. These layers typically include:
- Anti-static layer: also known as the electrostatic layer. This layer is typically found on the backside of the polyester film and serves a critical function in the overall DTF film structure. The primary purpose of the static layer is to prevent the build-up of static electricity on the film during the printing process. Static electricity can cause several issues, such as attracting dust and debris to the film, causing the ink to spread unevenly or resulting in misalignment of the printed design. By providing a stable, anti-static surface, the static layer helps ensure a clean and accurate print.
- Release liner: The base layer of the DTF film is a release liner, often made from a silicone-coated paper or polyester material. This layer provides a stable, flat surface for the film and ensures that the printed design can be easily removed from the film after the transfer process.
- Adhesive layer: Above the release liner is the adhesive layer, which is a thin coating of heat-activated adhesive. This layer bonds the printed ink and DTF powder to the film and ensures that the design stays in place during the transfer process. The adhesive layer is activated by heat during the heat press stage, allowing the design to adhere to the substrate.
DTF Powder: Composition and Classification
Direct to Film (DTF) powder, also known as adhesive or hot-melt powder, plays a crucial role in the DTF printing process. It helps to bond the ink to the fabric during the heat transfer process, ensuring a durable and long-lasting print. In this section, we will delve into the composition and classification of DTF powder to provide a better understanding of its properties and functions.
Composition of DTF Powder
The primary component of DTF powder is thermoplastic polyurethane (TPU), a versatile and high-performance polymer with excellent adhesive properties. TPU is a white, powdery substance that melts and transforms into a sticky, viscous liquid when heated. Once cooled, it forms a strong, flexible bond between the ink and the fabric.
In addition to TPU, some manufacturers may add other materials to the powder to improve its performance or reduce costs. For example, polypropylene (PP) might be mixed with TPU to create a more cost-effective adhesive powder. However, adding excessive amounts of PP or other fillers can negatively affect the performance of the DTF powder, leading to a compromised bond between the ink and fabric.
Classification of DTF Powder
DTF powder is typically classified according to its particle size, which affects its bonding strength, flexibility, and overall performance. The four main categories of DTF powder are:
- Coarse powder: With a particle size of around 80 mesh (0.178mm), coarse powder is primarily used for flocking or heat transfer on thicker fabrics. It provides a strong bond and high durability, but its texture can be relatively thick and stiff.
- Medium powder: This powder has a particle size of approximately 160 mesh (0.095mm) and is suitable for most DTF printing applications. It strikes a balance between bonding strength, flexibility, and smoothness, making it a popular choice for various types of fabrics and prints.
- Fine powder: With a particle size of around 200 mesh (0.075mm), fine powder is designed for use with thin films and heat transfer on lightweight or delicate fabrics. It creates a softer, more flexible bond compared to coarse and medium powders, but may have slightly lower durability.
- Ultra-fine powder: This powder has the smallest particle size, at approximately 250 mesh (0.062mm). It is ideal for intricate designs and high-resolution prints, where precision and smoothness are crucial. However, its bonding strength and durability may be lower compared to coarser powders.
When choosing a DTF powder, consider the specific requirements of your project, such as the type of fabric, the design's complexity, and the desired print quality. Selecting the appropriate powder for your application will ensure optimal results and long-lasting, vibrant prints.
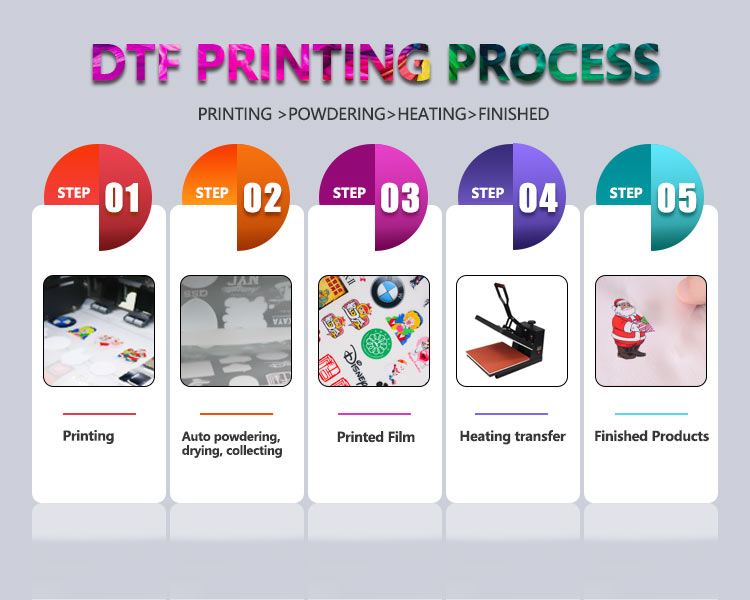
The Direct to Film Printing Process
The DTF printing process can be broken down into the following steps:
- Design preparation: Create or select the desired design using graphic design software, and ensure the image resolution and size are suitable for printing.
- Printing on PET film: Load the specially coated PET film into the DTF printer. Make sure the printing side (the rough side) is facing up. Then, start the printing process, which involves printing the colored inks first, followed by a layer of white ink.
- Adding adhesive powder: After printing, evenly spread the adhesive powder over the wet ink surface. The adhesive powder helps the ink bond with the fabric during the heat transfer process.
- Curing the film: Use a heat tunnel or oven to cure the adhesive powder and dry the ink. This step ensures that the adhesive powder is activated and the print is ready for transfer.
- Heat transfer: Position the printed film on the fabric, aligning the design as desired. Place the fabric and film in a heat press and apply the appropriate temperature, pressure, and time for the specific fabric type. The heat causes the powder and the release layer to melt, allowing the ink and adhesive to transfer onto the fabric.
- Peeling the film: After the heat transfer process is complete, let the heat dissipate, and carefully peel away the PET film, leaving the design on the fabric.
Care and Maintenance of DTF Prints
To maintain the quality of DTF prints, follow these guidelines:
- Washing: Use cold water and mild detergent. Avoid bleach and fabric softeners.
- Drying: Hang the garment to dry or use a low heat setting on a tumble dryer.
- Ironing: Turn the garment inside out and use a low heat setting. Do not iron directly on the print.
Conclusion
Direct to Film printers have revolutionized the printing industry with their ability to produce high-quality, long-lasting prints on various materials. By understanding the equipment, film structure, and the DTF printing process, businesses can capitalize on this innovative technology to offer top-notch printed products to their customers. Proper care and maintenance of DTF prints will ensure the longevity and vibrancy of the designs, making them a popular choice in the world of garment printing and beyond.
Post time: Mar-31-2023